How to Turn Any Notebook into a Commonplace Book
In past blog posts we’ve written about keeping a commonplace book, a kind of information journal where you write down facts, quotes, instructions, reference information, and other ideas that are interesting or meaningful to you—a personal reference book filled only with information that you find useful or meaningful. It’s a great organization tool for the things you want to remember.
Our first post in this series was all about what commonplace books are and how to use one. Our second post was about how to create a commonplace book using the Hobonichi Techo, which has a detailed index that makes it easy to organize the information in your notebook.
But you don’t need a built-in index to create a commonplace book of your own. If you have a favorite notebook that you love to write in, you can use that for your commonplace book too! In this post, we get into the fine details of indexing and share three methods for turning any notebook into a commonplace book.

Method 1: Create a page-by-page index
This is perhaps the most involved method of creating a commonplace book, with the most work up front, but it results in a complete index that includes every page of your notebook. This method gives you the most detailed reference for the contents of your commonplace book, with space to write the subject of each entry. It’s a bit like using a Hobonichi Techo with its yearly index, but you can do it with any notebook of your choice.
To create a page-by-page index, start by counting the number of pages in your notebook (you may be able to find this information online, though it can be worth double-checking if you have the patience!). In the opening pages of your notebook, you’ll begin to create an index. Make a skinny column for writing page numbers (leaving room for multiple digits as the numbers get higher), and a wider column for writing down topics in your index. Begin writing the page numbers in the skinny column.
Each time you begin a new index page, subtract 1 from the total number of pages in your notebook. That way, the index pages won’t be included in your final page count. Your index will most likely cover several pages.
When you reach the end of your index, number the remaining pages in your notebook. If you’ve subtracted the index pages from your total page count, the number of pages left in the book will match the number of pages you listed in the index.
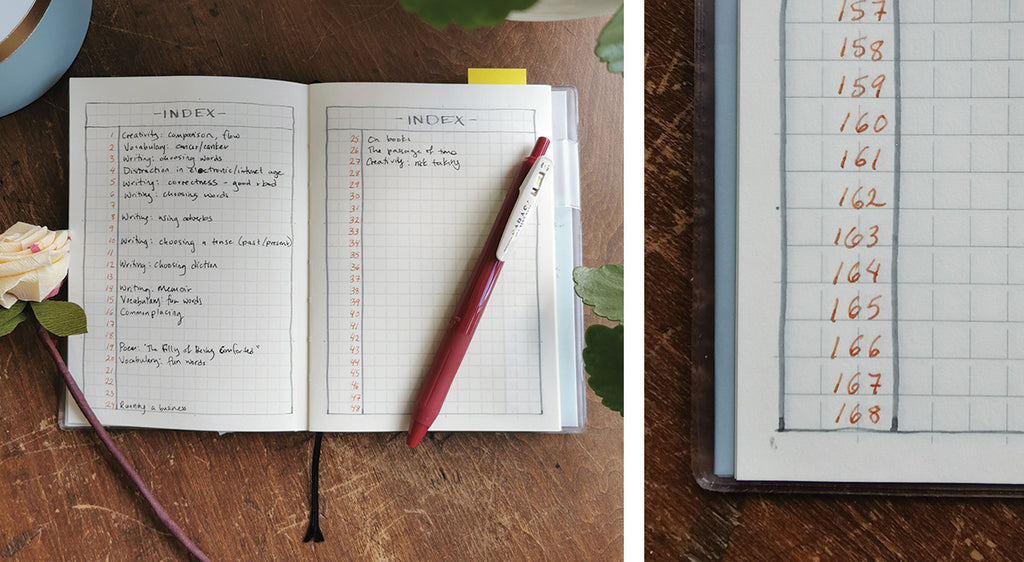
For this commonplace book we used an MD Paper A6 grid notebook. The notebook has 176 pages, and we laid out the index to cover the first 8 pages, so the notebook pages are numbered 1–168.
When you write an entry in your commonplace book pages, you can list the subject of the entry in the corresponding index row. If an entry covers several pages, you can simply list the subject in the index row where the entry begins, then leave the following index rows blank.
This method works best with lined or grid notebooks that are NOT numbered already. The lines or grid will help you create a neat index with rows for each page number. But you can also use a ruler or template to draw your own index chart in a blank notebook.
 The entry pages are numbered, corresponding to the index.
Method 2: Use a margin-and-index system
This method is adapted from a very old system of commonplacing: John Locke’s method, which he described in his 1685 treatise A New Method of Making Common-Place Books (published in English in 1706). It requires a little less prep work than the page-by-page index. The result is a slightly less detailed index where you won’t be writing the subject of each individual entry, but where you’ll still create a handy reference for looking things up by subject.
John Locke’s original system involved making an alphabetical index page at the beginning of the commonplace book, subdivided by vowel. On the entry pages, you’d create a margin where you wrote the main header or subject of each entry (e.g. “Poetry”). Then in the alphabetical index under “P(o),” you’d write the page numbers of any page where you recorded a poem. If the first letter of the header word were followed by a consonant (e.g. “Creativity,” you’d file it by looking for the first vowel following the first letter of the word (C(e) in this case).
Locke’s method is systematic and space-saving, but subdivision by vowel is a little convoluted. More problematic, we find this method makes it difficult to look things up later, because it requires you to remember exactly what header you used to classify each entry.
Instead, we prefer adapting and simplifying his method slightly. In this method, we create a simple alphabetical index (no extra vowels involved), and write the header word in the index along with the page numbers. That way, you can easily find a subject in your index (Poetry) and look up any pages where you’ve written poems. Each time you add a new subject to your commonplace book, record it in the index under the first letter of that subject. Each time you add a new page related to the subject, just write the page number after the subject header in the index.
The hardest part about this method is deciding how much space to devote to each letter in the index. We recommend adding more space than you think you need, especially for your first commonplace book. If you discover that you regularly write about certain subjects, you can always adjust the amount of space in future notebooks.
As with the previous method, you’ll create your index first, and then number the remaining pages of the notebook. (You can also use this method with an already-numbered notebook.) Decide how much space to give to each letter in your index. If your notebook has lines, you can count the number of lines and then use a ruler to subdivide the page by letter.

This notebook (the Life Vermilion A5 notebook) has 30 lines per page, so we divided the page by 5, allotting 6 lines to each letter of the alphabet. For more space, we could also have divided the page by 3 or by 2, giving 10 or 15 lines to each letter. You get to decide how big your index should be!
On the entry pages, use a ruler to draw a margin on each page. Record the headers of your entries in this margin so they’re easy to browse later. You can even write multiple entries on different subjects on one page, using the headers in the margin to differentiate.
 Use a ruler to create margins on the entry pages of your commonplace book. Then write the subject headers in the margins.
Method 3: Color-code by theme
This is the simplest method of indexing your commonplace book and requires the least amount of prep work. It’s a visual method that allows you to browse your book easily by subject. This method won’t let you look up specific entries by page, but it’s easy to implement and can even be used to organize the content of your notebook after the pages are filled out.
To color-code your notebook, all you’ll need is a couple of blank pages at the beginning of the notebook to create a color key, and page margins where you’ll color-code each entry. Reserve a page or two at the beginning of your notebook for the color key, then use a ruler to create thin margins on the sides of the notebook pages. This method works well with blank, lined, or grid notebooks, and you don’t need to number the pages.
Each time you make an entry in your commonplace book, use a colored dot sticker or a colored marker/pencil/tool of your choice to color-code the entry in the margin. For example, you could use a yellow dot for quotations, a blue dot for entries about astronomy, and a purple dot for recipes. Each time you start writing about a new subject in your notebook, choose a new color for that subject and add it to the color key at the beginning of the notebook.
If you’re not sure how you want to divide up your entry subjects, you can even wait until your notebook is filled out and then look for themes. You might find five or ten or twenty common themes in your entry pages, and you can go back and color-code them and create your color key after the fact.
 The index for this method is a simple color key. Colored dot stickers are simple to use and carry around in your notebook, or you can color-code with highlighters, markers, or any other tool of your choice.
 Corresponding colored dots in the margins of your pages let you browse your commonplace book by subject. This is a very visual and easy-to-use method.
This idea of a “common place book” is absolutely fascinating! I am so happy to find this article as I have so many ideas, thoughts, recipes, journal entries, etc., written down randomly and I find them just about anywhere in my house. I love the thought of bringing all of these entries together in an orderly fashion so I can enjoy them and so can future generations! Thank you, so much, for sharing this very valuable information!
Michelle, I really like your idea of using a separate sheet of paper and your topic keywords. I am about 1/2 way through my commonplace book, and this will work really well. Thank you for sharing!
Thank you for putting this together. I’d like to add my method in case it’s helpful to anyone. I number all of my pages. I don’t put an index at the beginning. Throughout the book I write quotes or what have you. After the writing I make note of any categories it falls under. The line after the quote might look like: [poetry] [autumn] [weather].
Then on a piece of paper that is kept folded in the book I’ll either add the new category or find the category and add the page numbers. Thus is ultimately a scrap paper, so there is no need to worry about space or looks.
Example: Poetry: 5, 7, 16
Autumn: 12, 16
Weather: 16
Now, when I’ve come close to filling the book, I use the last handful of pages to write an index. At this point I alphabetical my scrap paper. It’ll look like the end of a cookbook.
I like this method, because each entry can have multiple categories and I don’t have to guess how much I’ll need at the beginning.
I really liked your article. It is very detailed and informative. I had never heard of a commonplace book before but i think it will be a big help for me to not have to go thru a lot of journals and notebooks looking for some bit of info that i knew that i had witten down in one of my books. I am 62 years old, I have lots of journals, notebooks, even pieces scratch paper with info that i want to index in a commonplace book. Thanks much, I can’t wait to get started – Angie
Thanks for the great comment, Steve! What an excellent idea to use a binder to track all your notebooks.
Leave a comment